What is HTML Video, and How to Make HTML Videos with AI
1. Understanding HTML Video in One Sentence
Think of HTML video as: not filmed with a camera, but written with web pages.
It's especially well-suited for these types of content:
- Knowledge explainers
- Product demonstrations
- Tutorial videos
- Data storytelling
- Process walkthroughs
Because what matters most in these videos isn't camera direction — it's:
- How clear the text is
- How well the information hierarchy reads
- Whether the charts and animations are accurate
- How easy it is to revise later
These are exactly the strengths of HTML video.
2. Why SVGAnimate AI Is the Recommended Starting Point
If you've looked into "code-generated video" approaches before, you may have noticed two problems:
- Some tools are too low-level — you have to set up your own environment, write your own code, and debug everything yourself
- Some tools offer one-click generation, but the process is a black box and revisions are painful
Today, I'll introduce the newly launched HTML video creation feature of SVGAnimate AI.
With this feature, you can easily create professional-looking HTML videos.
SVGAnimate gives you:
- Direct topic input
- Automatic script and storyboard generation
- HTML visuals generated for each scene
- Narration, subtitles, and export — all built in
- The ability to edit any layer along the way
The entire process is automated. You only need to confirm decisions at key steps. Let me walk you through how to create an HTML video with this tool.

3. How to Create an HTML Video with SVGAnimate AI
Step 1: Decide What You Want to Explain
Don't start with a huge topic. For your first video, the best subjects are:
- One concept explained clearly
- One product feature described completely
- One process demonstrated end to end
For example:
- What is a vector database?
- What's new in DeepSeek-V4?
- What problem does my product solve?
- How does this workflow run step by step?
For your first video, aim for 30 seconds to 2 minutes. It's easier to generate, and easier to judge what needs fixing.
Step 2: Write a Clear One-Sentence Brief
In SVGAnimate AI, you don't need a long prompt — but your sentence should cover four elements:
- What the topic is
- Who it's for
- What style you want
- What the video will be used for
For example:
Create a 60-second English explainer video on "What is a vector database," aimed at beginner product managers, with a clean modern style, suitable for YouTube or LinkedIn.
If you're making a product introduction, try:
Create a 90-second product introduction video for SVGAnimate AI — a tool that helps creators quickly generate knowledge explainer videos. Target audience: teachers, students, and content creators who want to make short videos. Style: professional, clear, with a touch of tech aesthetic.
A clear one-sentence brief almost always produces more stable results.
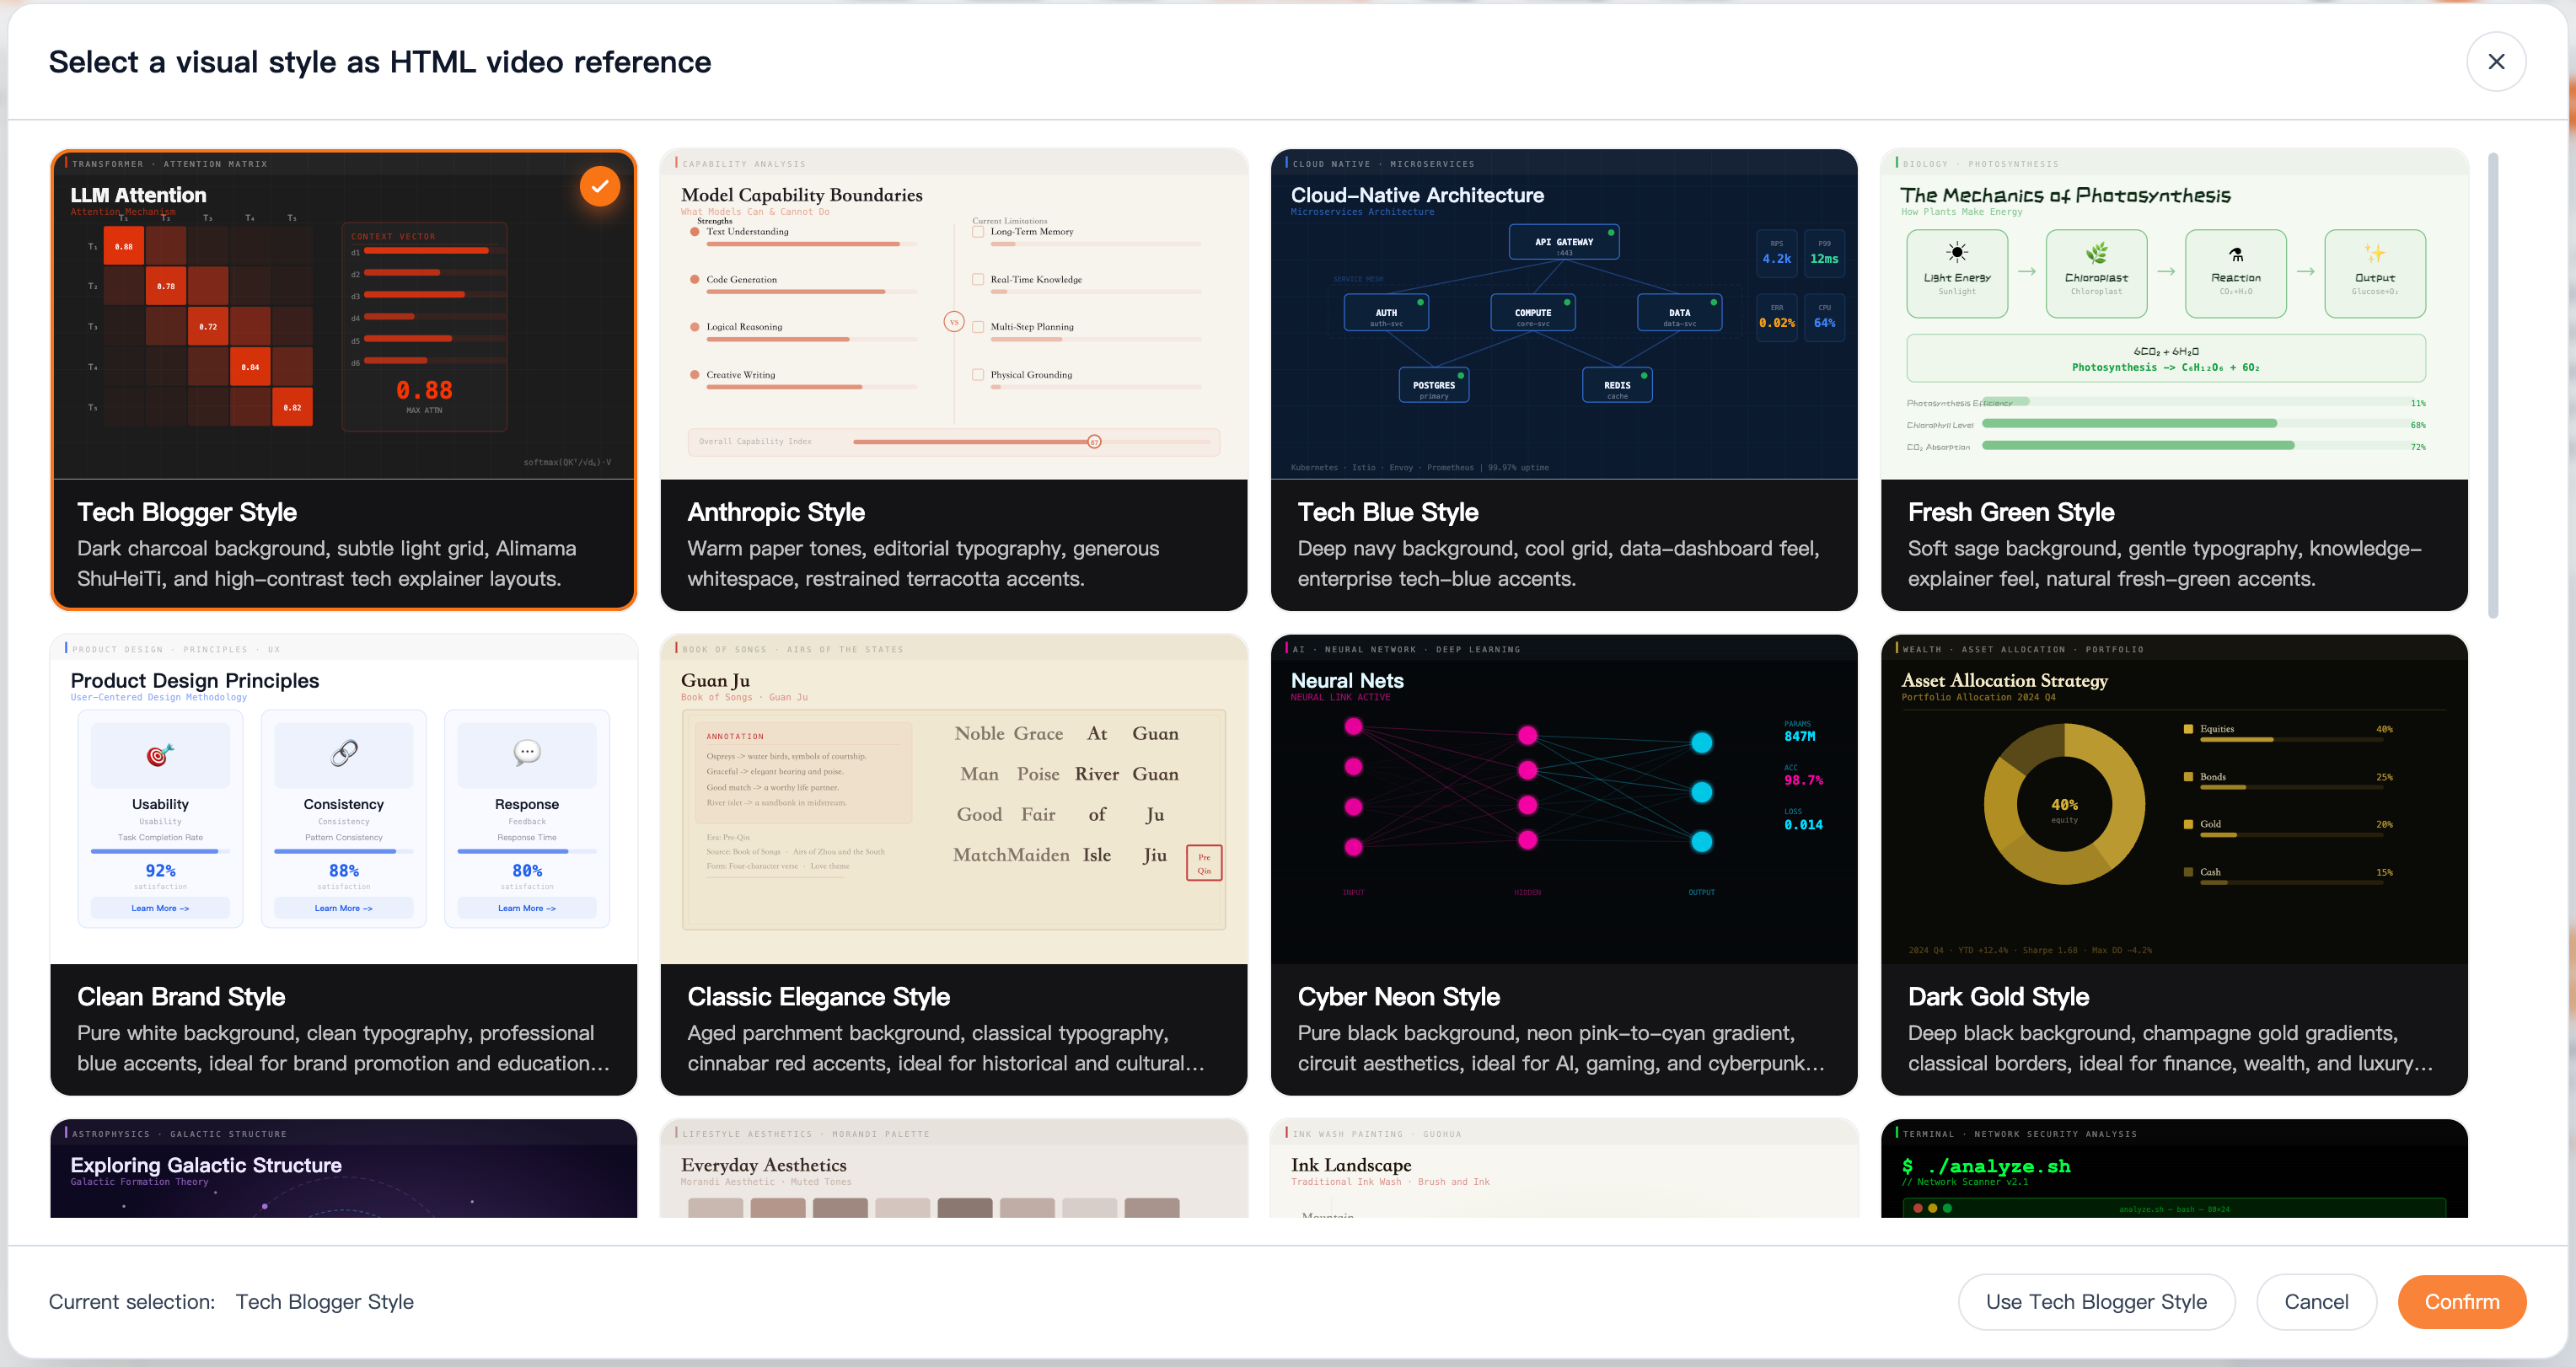
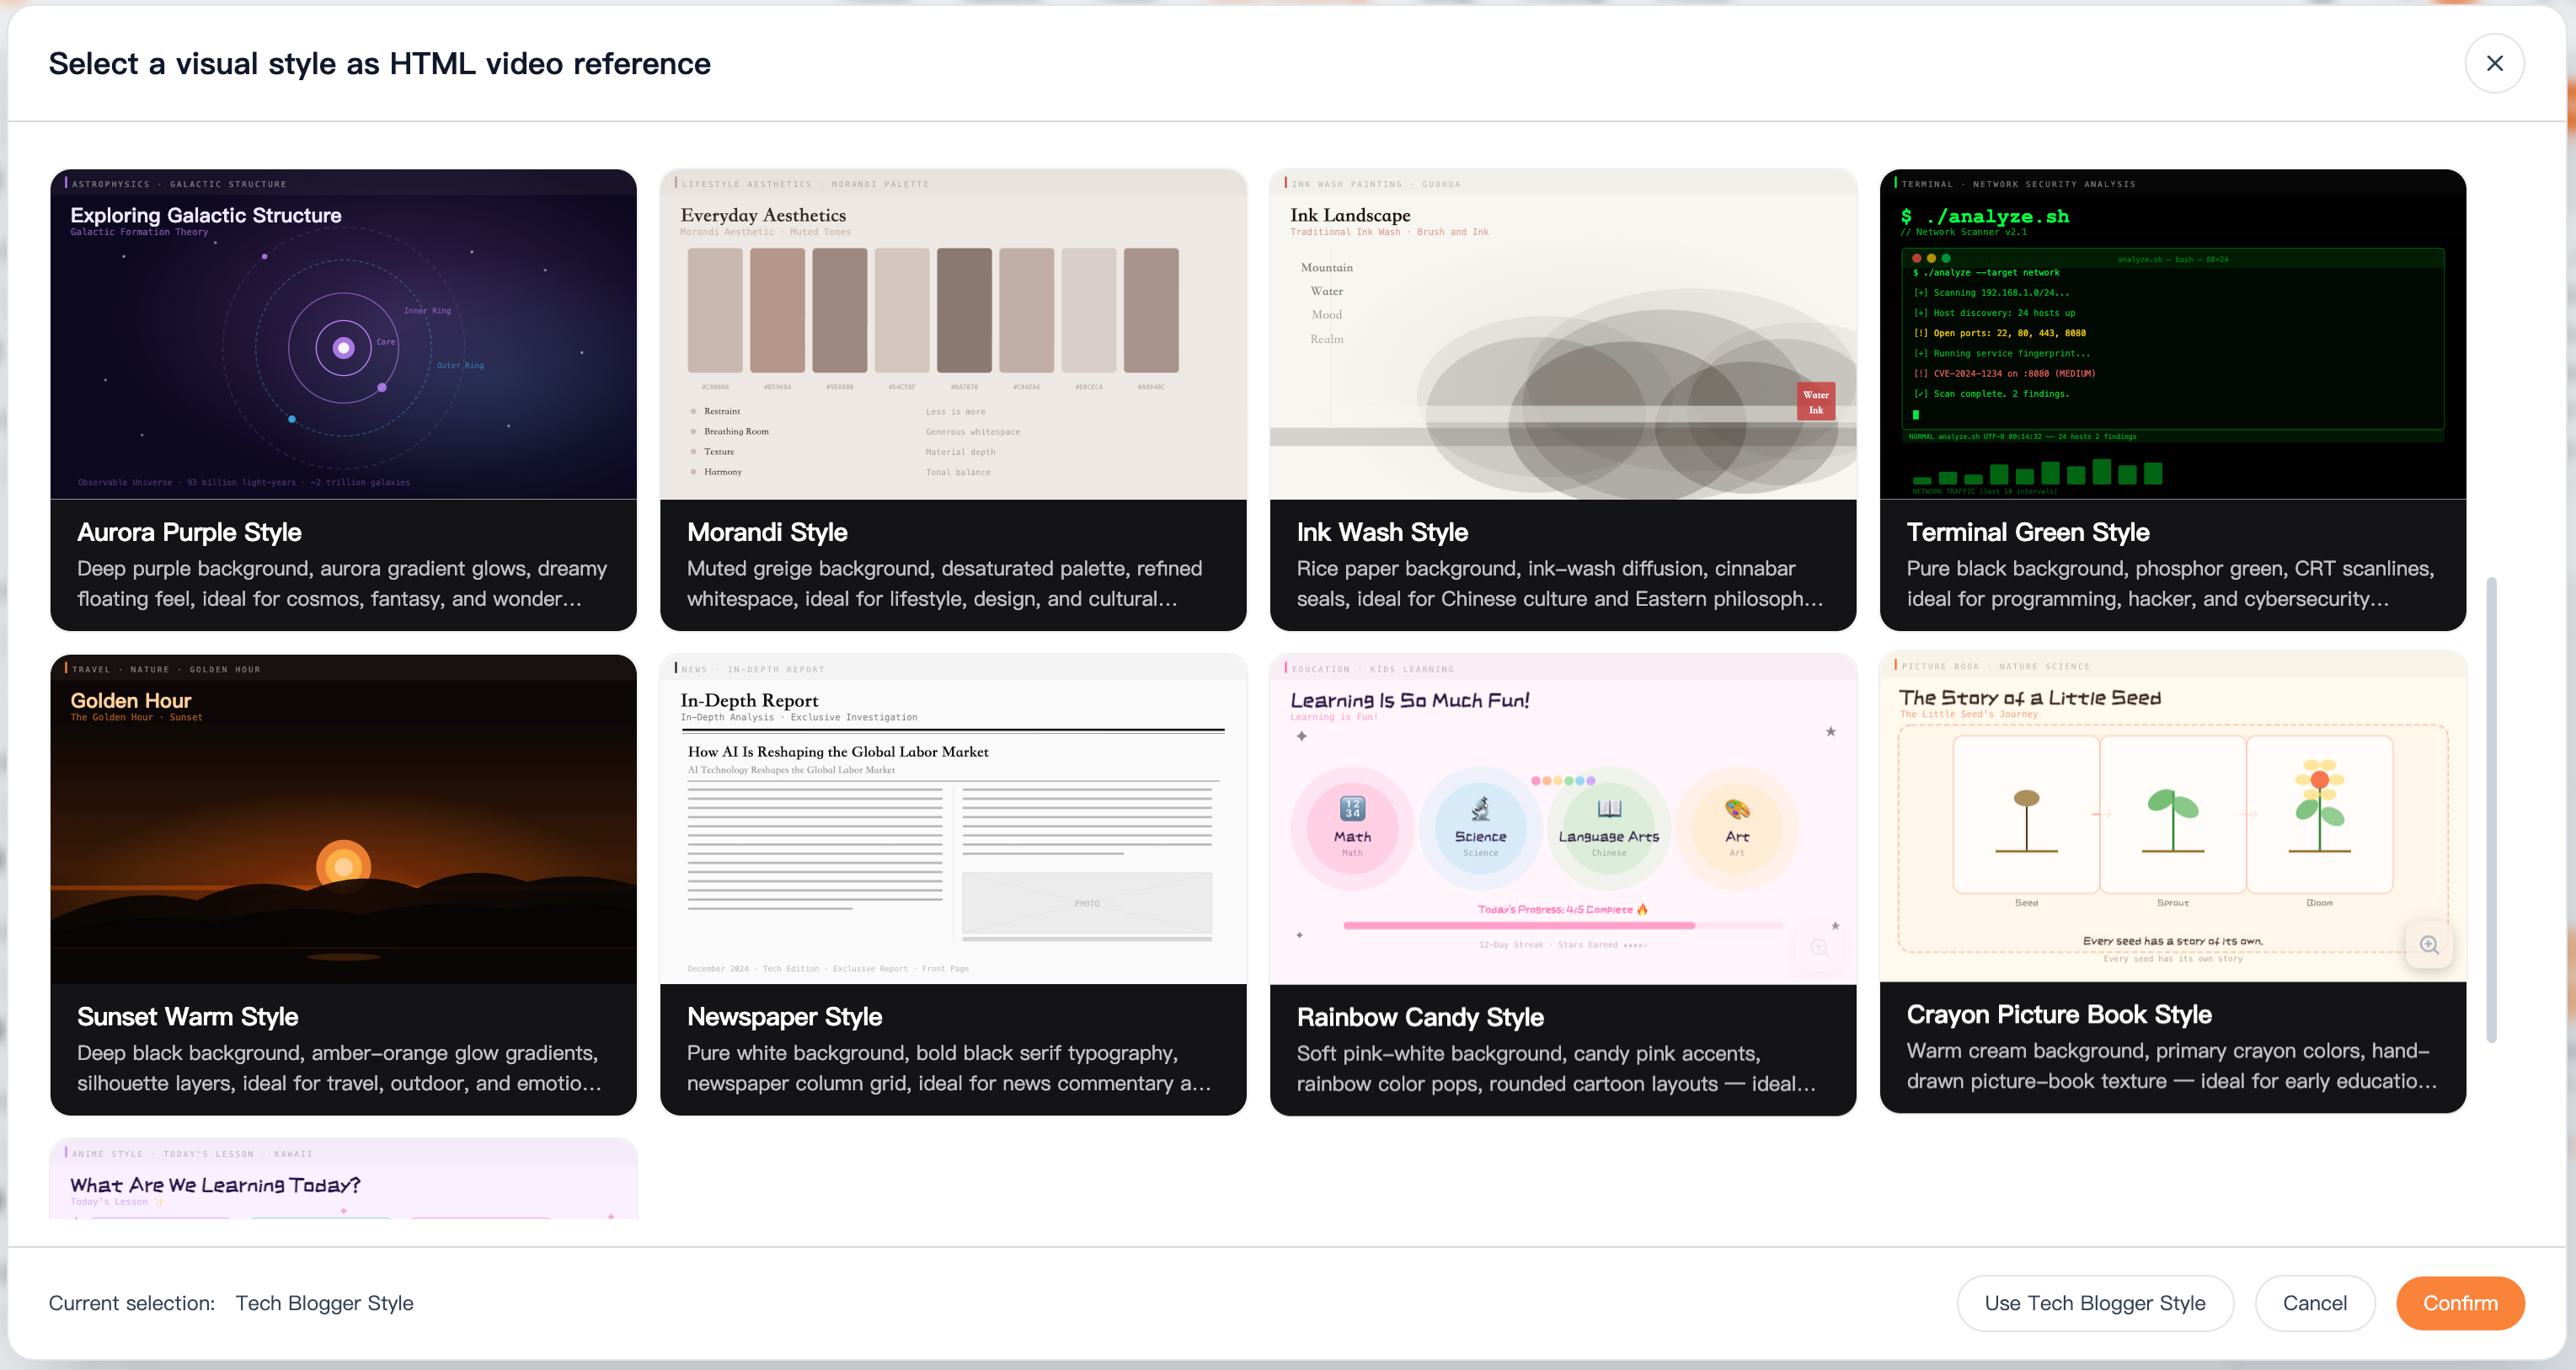
Step 3: Choose a Visual Style
After confirming the script, the next step isn't exporting — it's picking a visual style.
SVGAnimate AI has built-in style presets you can browse and select based on your content direction.
Simple guidance for choosing:
- For knowledge explainers: prioritize clear, restrained, information-forward styles
- For product introductions: choose more modern, UI-influenced styles
- For broader audiences: choose styles with stronger rhythm and visual expressiveness
On your first video, don't chase flashy. Chase consistency. The biggest enemy of an explainer video isn't "not impressive enough" — it's inconsistent style across scenes.
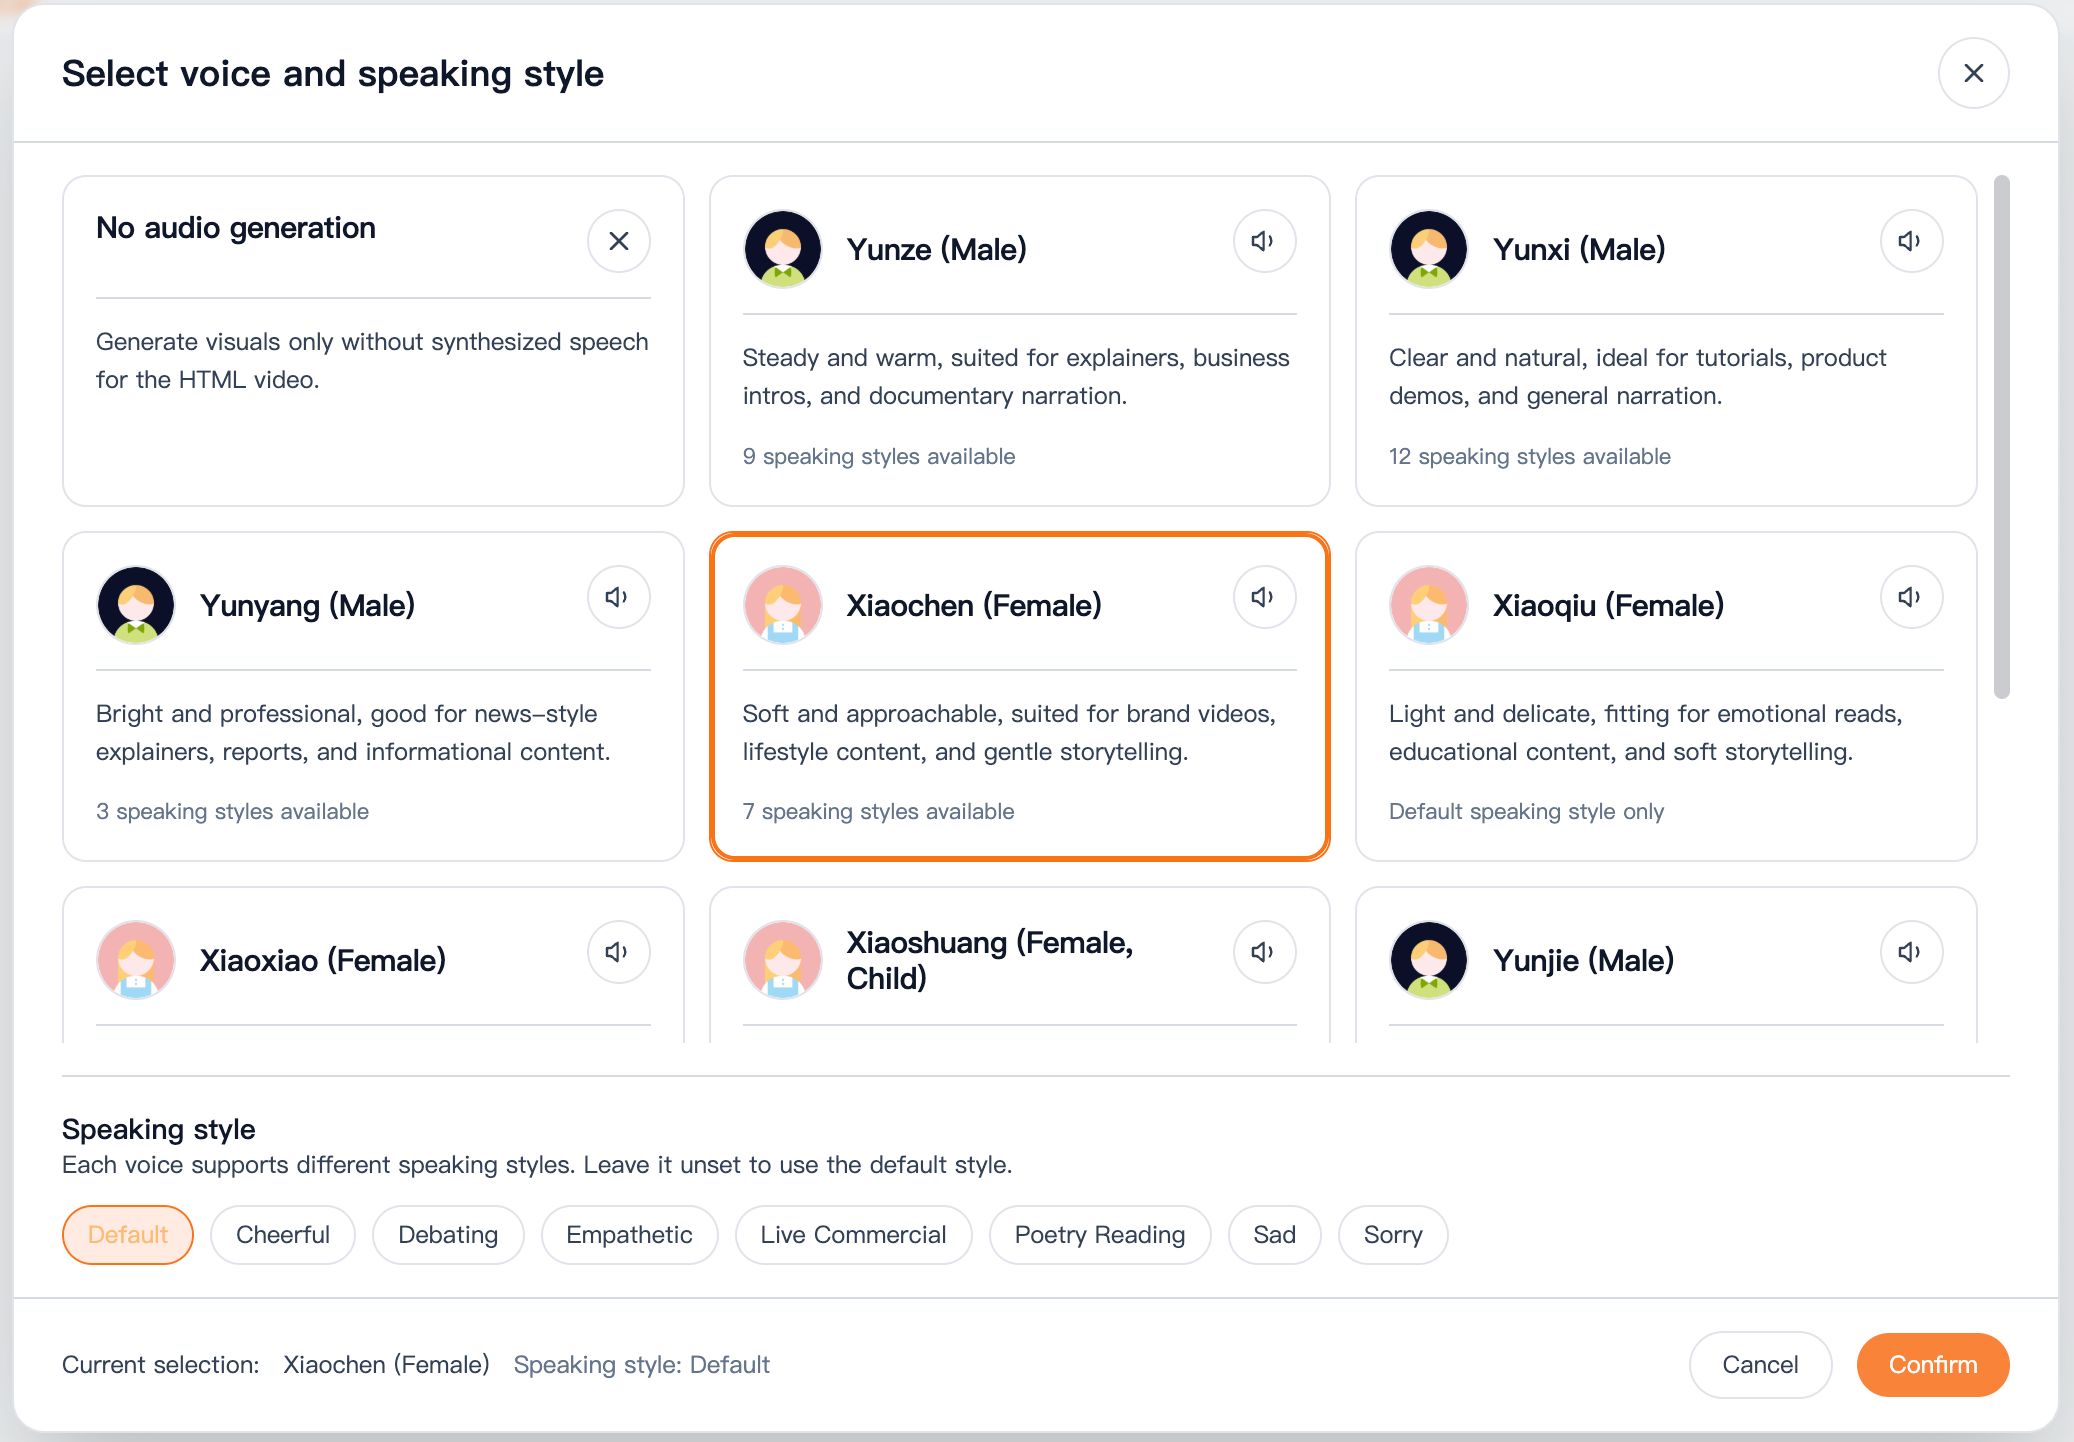
Step 4: Choose a Narration Voice
Many knowledge videos live or die not just on visuals — but on whether the voice sounds natural.
One of the strengths of a product like SVGAnimate AI is that voice selection is built right into the workflow. You can preview voices before committing to one for the whole video.
Practical advice:
- For knowledge content: favor stable, clear voices
- For product introductions: choose voices with a more presentation-like, deliberate rhythm
- If you plan to record your own voice later: disable the built-in narration and keep only the visual and subtitle pipeline
Don't underestimate voice selection. The same script with a different voice can feel dramatically different to the viewer.
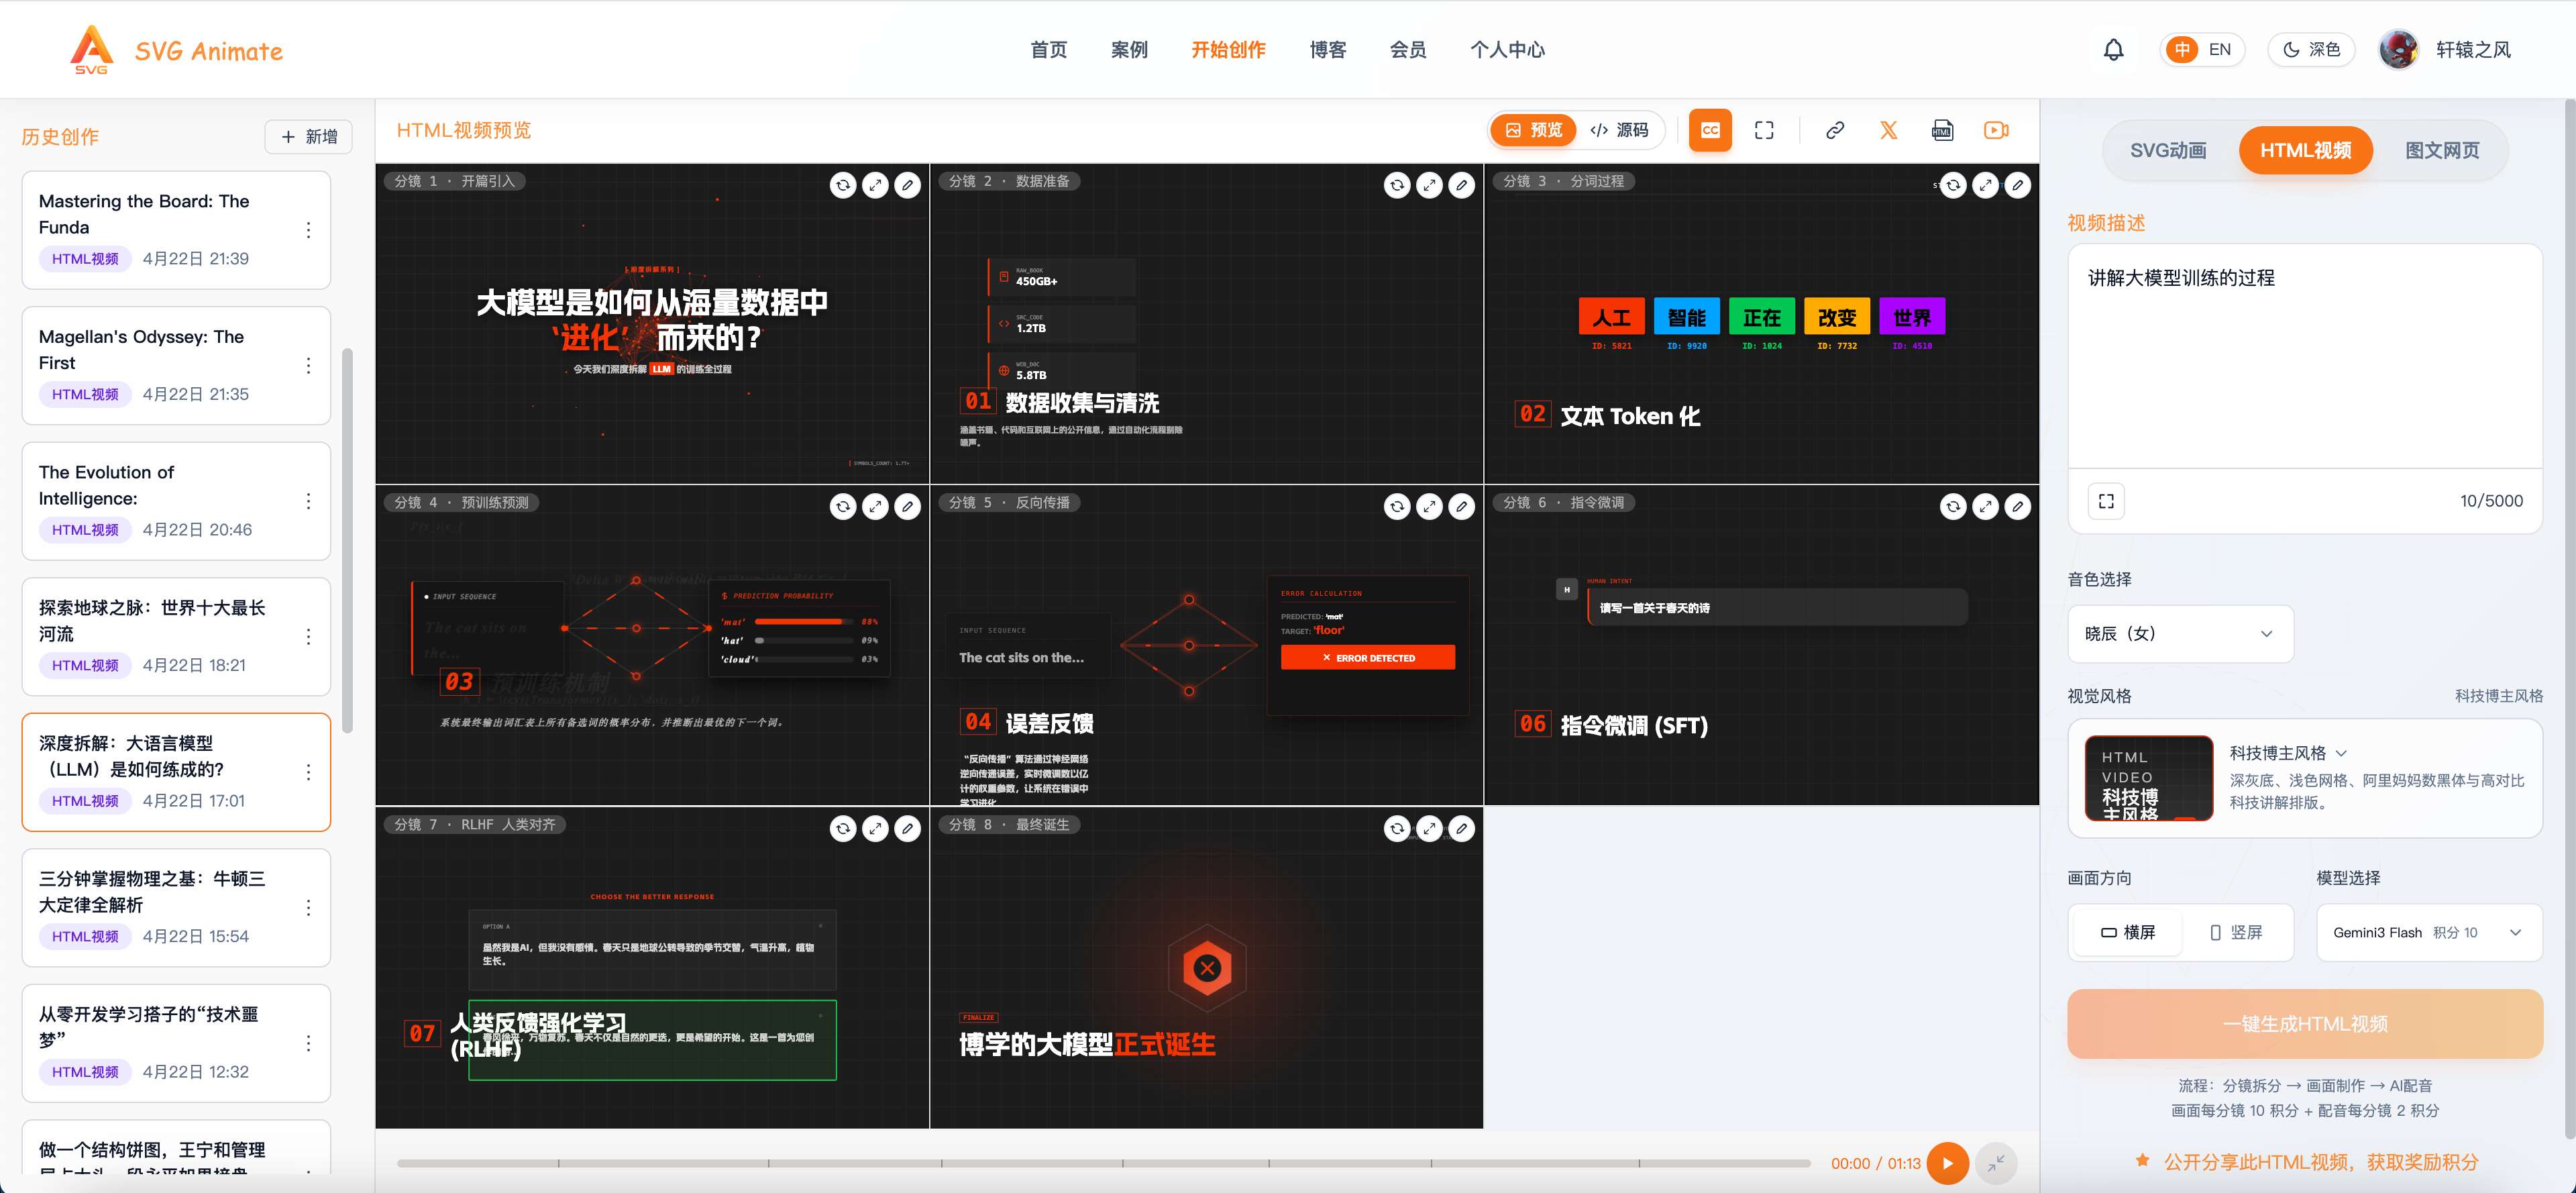
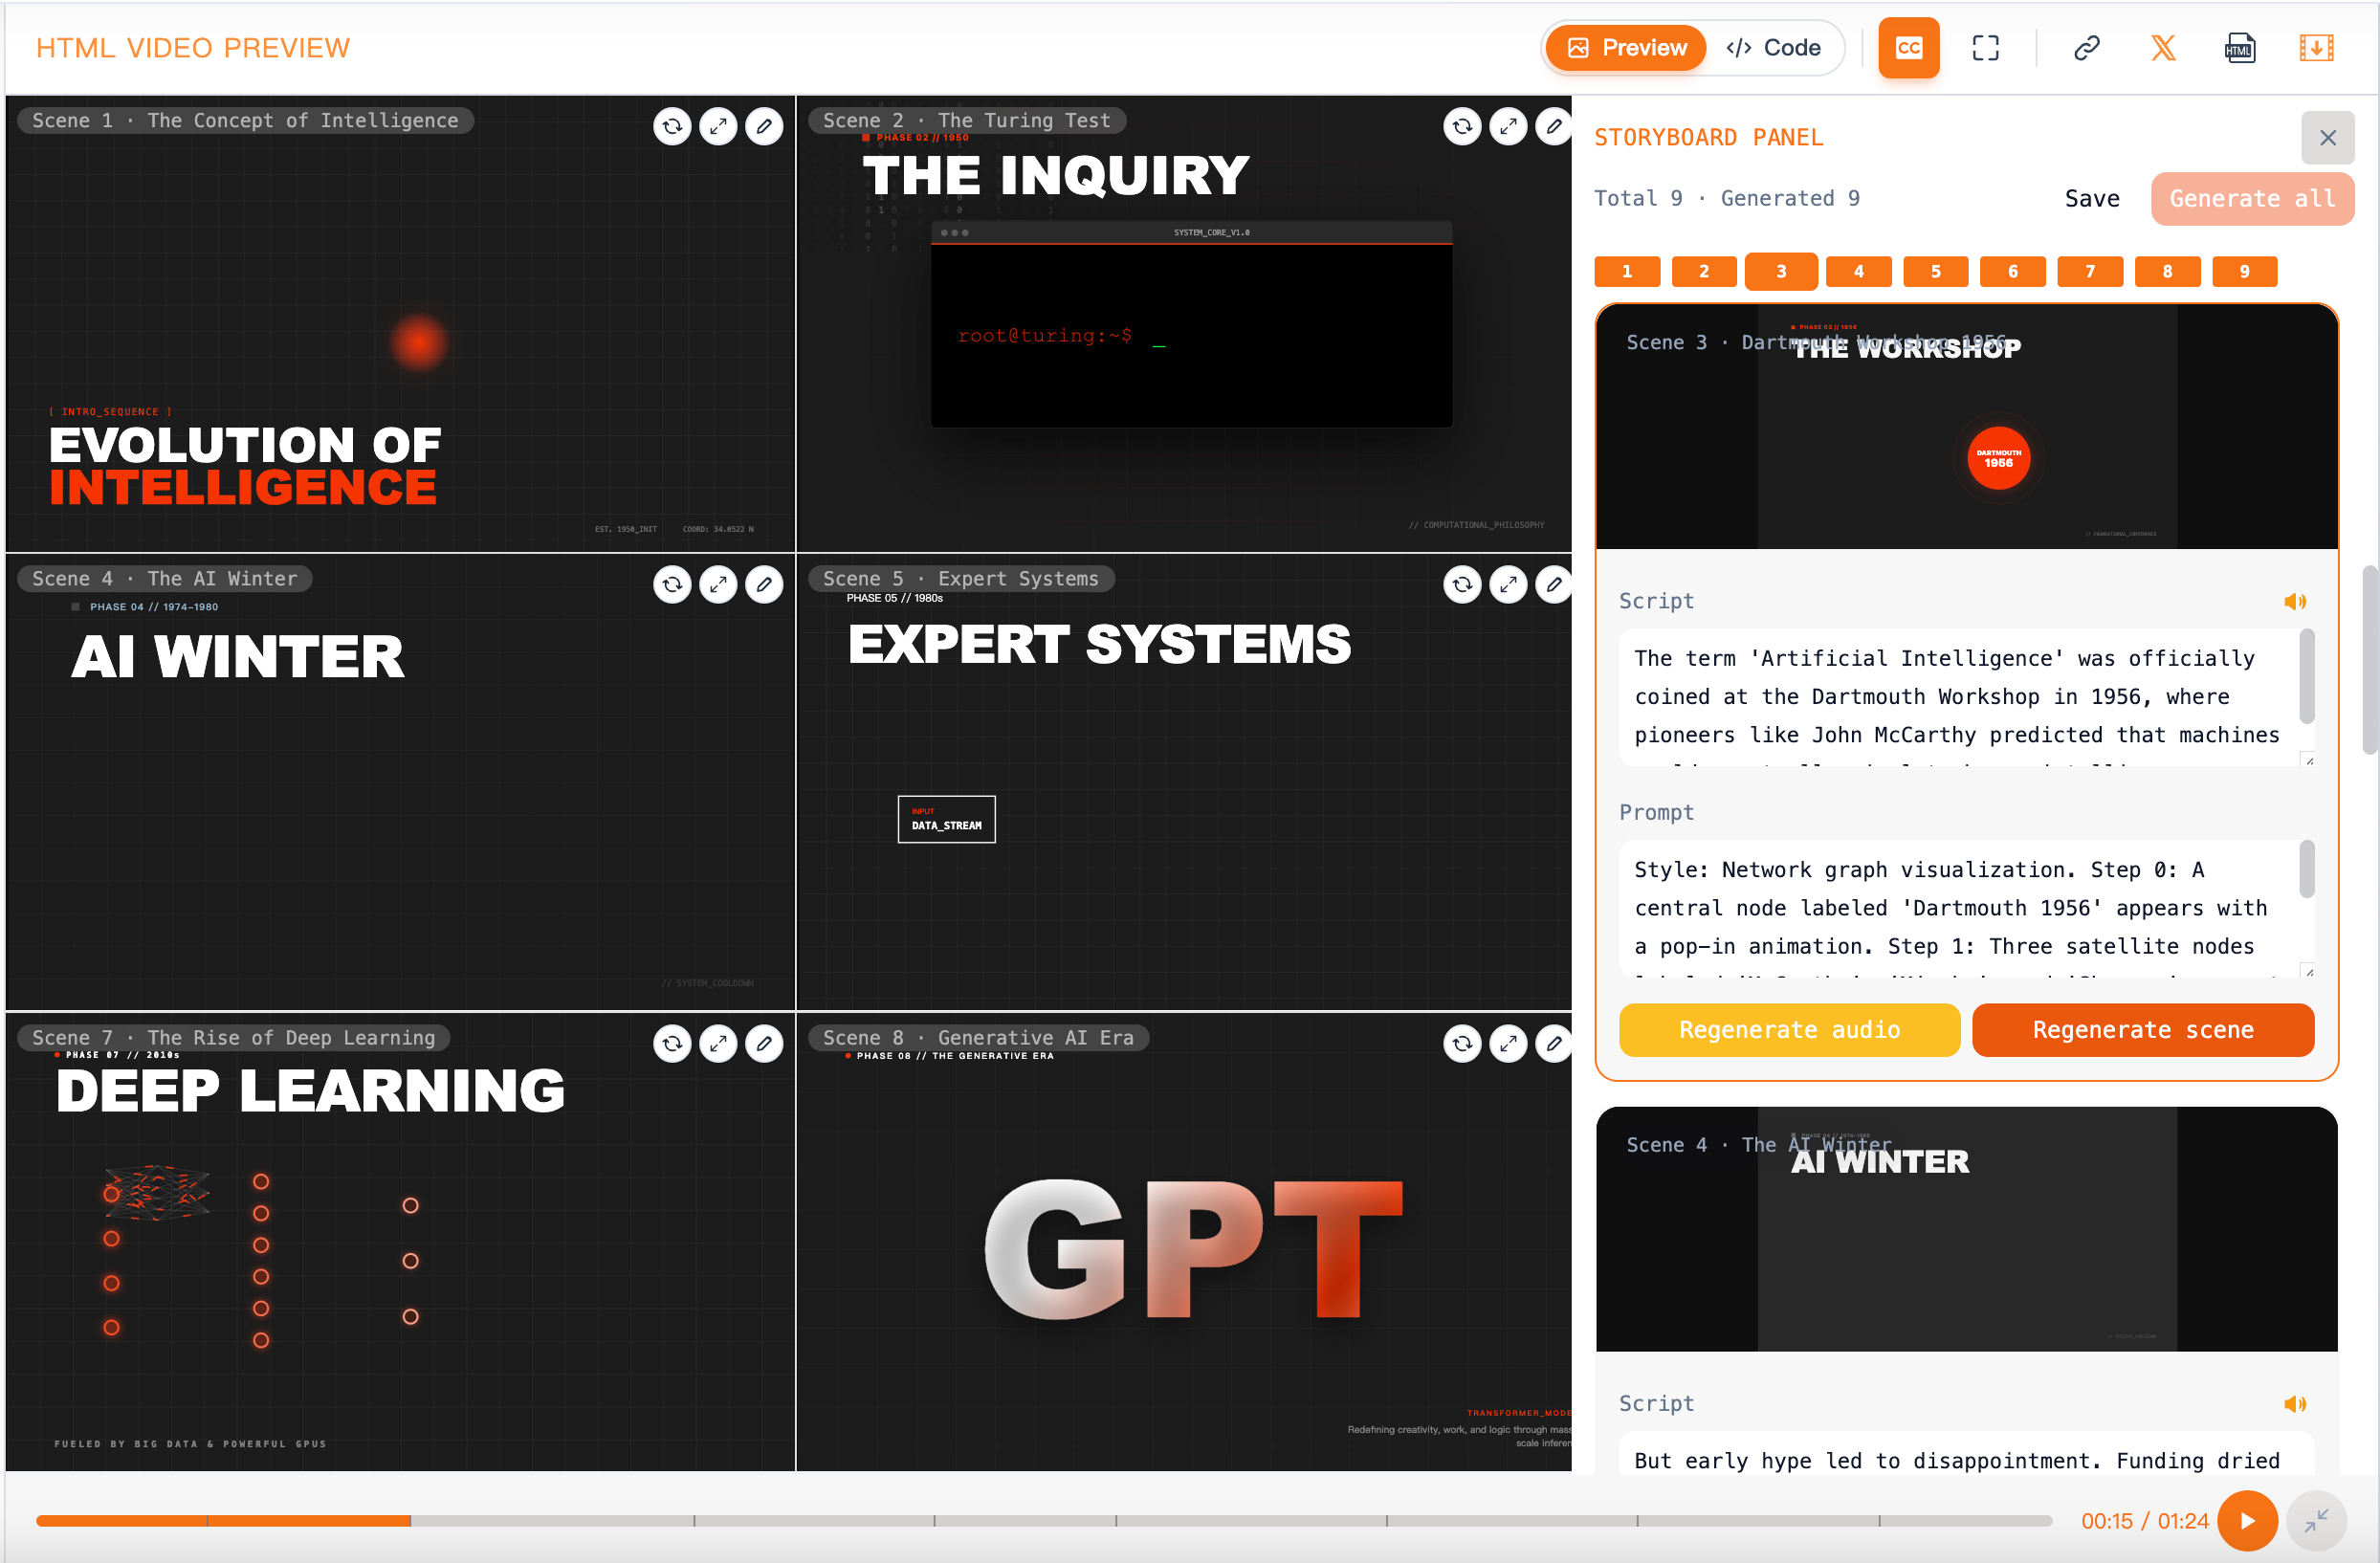
Step 5: Review Each Scene's Visuals
Next, SVGAnimate AI converts each storyboard panel into an independent HTML scene.
At this step, pay attention to:
- Whether titles are properly emphasized
- Whether there's too much text on screen
- Whether the graphics and layout serve the content
- Whether the visual style is consistent from scene to scene
If one or two scenes look off, don't rush to redo the whole video. First identify exactly which segment has the problem.

Step 6: Fix One Thing at a Time — Don't Rebuild Everything
This is actually one of the most valuable aspects of SVGAnimate AI.
It doesn't just produce a one-shot result. Many layers of the video can still be edited after generation.
In practice, diagnose issues like this:
- If the logic doesn't flow → revise the script
- If a scene doesn't match the point → revise that storyboard panel
- If a scene looks cluttered → regenerate just that scene
- If the narration rhythm feels off → adjust the voiceover for that section
This is far more efficient than "regenerate everything and hope for better luck" — and far better suited for people who genuinely want to polish their content.
Step 7: Export, Then Decide on Secondary Editing
Once script, visuals, and narration are all confirmed, export the final video.
At this point, the video is usually ready to publish directly. But if you want to do more:
- Use SVGAnimate AI to generate the main content
- Import the exported video into CapCut or Premiere Pro
- Add an intro, thumbnail, on-camera commentary, or platform-specific subtitles
This workflow suits modern content creators perfectly: let AI handle the most time-consuming explainer content, then you apply the final polish.
4. Common Mistakes When Using SVGAnimate AI for the First Time
If you want to avoid the most common pitfalls, remember these points:
1. Don't Pick a Topic That's Too Big
Trying to cover "the complete process of training a large language model from scratch" on your first video will almost always result in a scattered script and scattered storyboard. Start with something smaller and more focused.
2. Don't Lead with Visuals
The most important thing in an explainer video is structure, not style. Get the script right first, then evaluate whether the visuals are strong enough.
3. Choose Stability Over Flash
On your first video, pick a style that communicates information clearly — not one that's visually extravagant. Clear beats dazzling every time.
4. Learn How to Edit Locally
The real efficiency multiplier isn't getting a perfect result on the first try — it's knowing:
- When to revise the script
- When to revise the storyboard
- When to regenerate a single scene
Mastering this will directly determine how fast you move on your second, third, and fourth videos.
5. Writing a Better Brief for Product Introduction Videos
If your goal isn't general knowledge content but a video about your own product, SVGAnimate AI works just as well.
When writing your brief, emphasize:
- What problem the product solves
- Who it's for
- What the core value proposition is
- Whether the video should lean toward "explanation" or "demonstration"
For example:
Create a 90-second product introduction video for a tool that uses AI to quickly generate knowledge explainer videos. Target audience: teachers, students, knowledge creators, and indie developers. Style: professional, modern, and clear. Key message: "input one sentence to generate a full script, storyboard, visuals, and narration."
A brief like this almost always produces content that's more focused — and more publishable — than just "make a video about my product."
Conclusion
For most people, the real value of HTML video isn't the concept itself — it's that this approach genuinely makes explainer videos faster to create and easier to revise.
And if you don't want to build your own low-level toolchain, but want to start from "produce your first video," then SVGAnimate AI — with its integrated script, storyboard, scene, narration, and local editing capabilities — is one of the most practical entry points available.
Start with one small topic. Get through the full process once. Then move to longer, more complex videos. That's almost always the most reliable way to begin.
SvgAnimate
SvgAnimate Contributor